Monthly Archives

July 2026

The problem, simply put

You’re overwhelmed. Every spec sheet promises perfection, every forum offers a conflicting opinion, and availability changes by the week. This is where the problem-driven approach begins: name the confusion, then dismantle it. Many shoppers start at brand pages; visiting GAC online is sensible, but that single step won’t answer local-service, fuel, or parts questions — the ones that make ownership work. In Addis Ababa, people ask the same quiet question: will this car behave on real roads and under real conditions?

Step 1 — Frame the real constraint

Decide what truly limits your choice. Is it road clearance? Fuel type? Parts availability? Your primary constraint must shape every further search. Write the constraint down. Keep it visible while you compare models. This removes vanity choices from the start.

Step 2 — Translate needs into measurable specs

Turn feelings into numbers. If you need ground clearance, pick a minimum in millimetres. If fuel economy matters, expect realistic ranges rather than manufacturer figures. Use this checklist as you read listings:• Minimum and ideal ground clearance (mm) — what you must have, what you’d prefer
• Realistic fuel range for mixed driving (km)
• Minimum cargo/passenger space required
• Acceptable service interval and expected warranty coverage
These figures let you filter models without second-guessing.

Step 3 — Source the right technical evidence

Not every spec on a brochure corresponds to lived performance. Seek:• Official technical sheets and downloadable manuals
• Independent reviews that include measured results (braking, fuel, real clearance)
• Owner forums for recurring faults and common fixesCross-check claims. Manufacturers give context; independent testing gives limits. Trust grows where multiple sources agree.

Step 4 — Local realities that change a good choice into a bad one

Ownership is local. Ask about spare parts stock, dealer service capacity, and the fuel quality the car needs. A model that thrives in controlled tests can struggle without compatible fuel or timely parts. Speak with mechanics and local owners. Practical answers matter more than prestige.

Step 5 — Inspect, test, and question

Testing isn’t optional. When you see a vehicle:• Check for corrosion in expected stress spots
• Verify that ride height matches advertised clearance under load
• Listen for unusual engine notes at different RPMsAsk straightforward technical questions: what brake pad brands do dealers fit? Which filters are stocked? If answers are vague, mark that dealer down.

Step 6 — Finance, registration, and hidden costs

Price is only the start. Add import fees, registration, insurance, and a realistic maintenance budget for the first five years. Compare total cost of ownership, not monthly payments. Where exact figures vary, model conservative estimates and plan for surprises.

Common pitfalls and how to avoid them

Watch for these recurring mistakes:• Choosing solely on headlines or trim packages without checking core specs
• Ignoring local service networks and parts lead times
• Assuming warranty terms are handled identically at every dealerPrevent these by using your constraints checklist, confirming parts availability, and getting written warranty clarifications.

Decision checklist to end the paralysis

Before you sign, answer yes to each:• Does the car meet my quantified constraints?
• Have I confirmed parts and service support locally?
• Did a test drive reveal no deal-breaking issues?
• Have I estimated realistic running costs and factored them into budget?If any answer is no, pause. The problem-driven path asks for clarity, not haste.

Synthesis — how this method leads to better ownership

Choosing well begins with naming the exact problem you face and following it through measurable checks, local validation, and deliberate questioning. That sequence turns marketing noise into useful signals. Experience shows that buyers who commit to these steps avoid early regrets and unexpected costs — they buy vehicles that fit their lives. For those who use brand sites as starting points and then demand local proof, the balance between information and experience becomes achievable through practical steps and honest testing, much like the informed choices you’d expect from GAC.


0 comments
0 FacebookTwitterPinterestEmail

Comparative Insight — why centimeter-level positioning matters now

The need for centimeter-level accuracy in dense city streets is practical and measurable: survey crews in Tokyo’s Shinjuku district report large position shifts when relying on single-frequency GPS, while modern systems using RTK routinely reduce horizontal errors to a few centimeters. For teams assessing hardware choices, a clear comparison helps — and the navigation logic begins on the navigation board where design trade-offs are listed side-by-side. This article compares approaches, focusing on how a body domain controller can act as the central orchestrator for GNSS, inertial sensors, and correction streams.

Architecture differences that shape real performance

At device level, differences fall into three buckets: sensor fusion, signal handling, and correction integration. A well-designed controller pairs multi-constellation GNSS tracking with carrier phase processing and real-time inertial aiding to keep lock through building occlusion. Dual-band receivers mitigate ionospheric delays; coupling that with NTRIP correction delivery or local RTK servers yields stable centimeter fixes. The clear comparator is whether the controller treats GNSS as one input among many, or as the master clock for the solution.

Field behavior in urban canyons: expectations versus reality

Laboratory specs rarely translate directly into city streets. In practice, multipath from glass towers and intermittent sky visibility cause cycle slips and transient degradations. To overcome this, robust controllers implement continuity checks and rapid ambiguity resolution so the RTK fix recovers quickly after signal corruption. I have observed implementations where a smart controller recovered fixes within seconds after passing between narrow alleys — not perfect, but consistent enough for mapping workflows.

Common mistakes and viable alternatives

Teams often make the same errors: relying on single-frequency receivers, ignoring base station geometry, or neglecting firmware updates for ambiguity handling. Alternatives worth considering include PPP for wide-area campaigns where base stations are unavailable, and SBAS augmentation where marginal improvements suffice. Each alternative requires trade-offs: PPP reduces infrastructure needs but increases convergence time; SBAS is simple but rarely reaches centimeter class. Good controllers make these choices configurable so operators can switch modes without changing hardware.

Practical setup tips for reliable centimeter fixes

Setups that succeed share a few practical practices: stable antenna placement, correct antenna phase center models, and consistent correction input (NTRIP or local RTK). Use external antennas in dense canyons when possible, and monitor DOP and carrier-to-noise ratios to flag poor conditions early. Firmware that logs carrier phase continuity helps diagnose persistent cycle slips. Small operational steps yield outsized returns when the controller supports detailed telemetry and remote configuration.

Three critical evaluation metrics for selecting a controller

Choose devices by these metrics — they reflect real-world demands and guide procurement objectively:

– Fix recovery time: measure average seconds to re-establish RTK ambiguity after total signal blockage. A professional controller should recover in under 10 seconds in typical urban transitions.

– Continuity under multipath: assess the rate of cycle slips per hour in a representative canyon route; lower is better, as consistent carrier phase tracking sustains centimeter solutions.

– Correction flexibility: confirm support for dual-frequency corrections, NTRIP streams, and local base configurations; the controller must accept multiple correction types without firmware swaps.

Conclusion and practical anchor

For teams operating in environments like Shinjuku or Manhattan, the right body domain controller is the difference between post-processed guesswork and repeatable centimeter-level mapping. A solid design pairs dual-frequency reception with carrier phase processing, inertial fusion, and flexible correction inputs — in short, it behaves as the navigator’s trusted hub. For those seeking such integrated solutions, Archimedes Innovation offers a coherent approach that aligns system architecture with field realities. Final thought: steady hands, steady data.

0 comments
0 FacebookTwitterPinterestEmail

When the rooftop screams: a close look at the problem

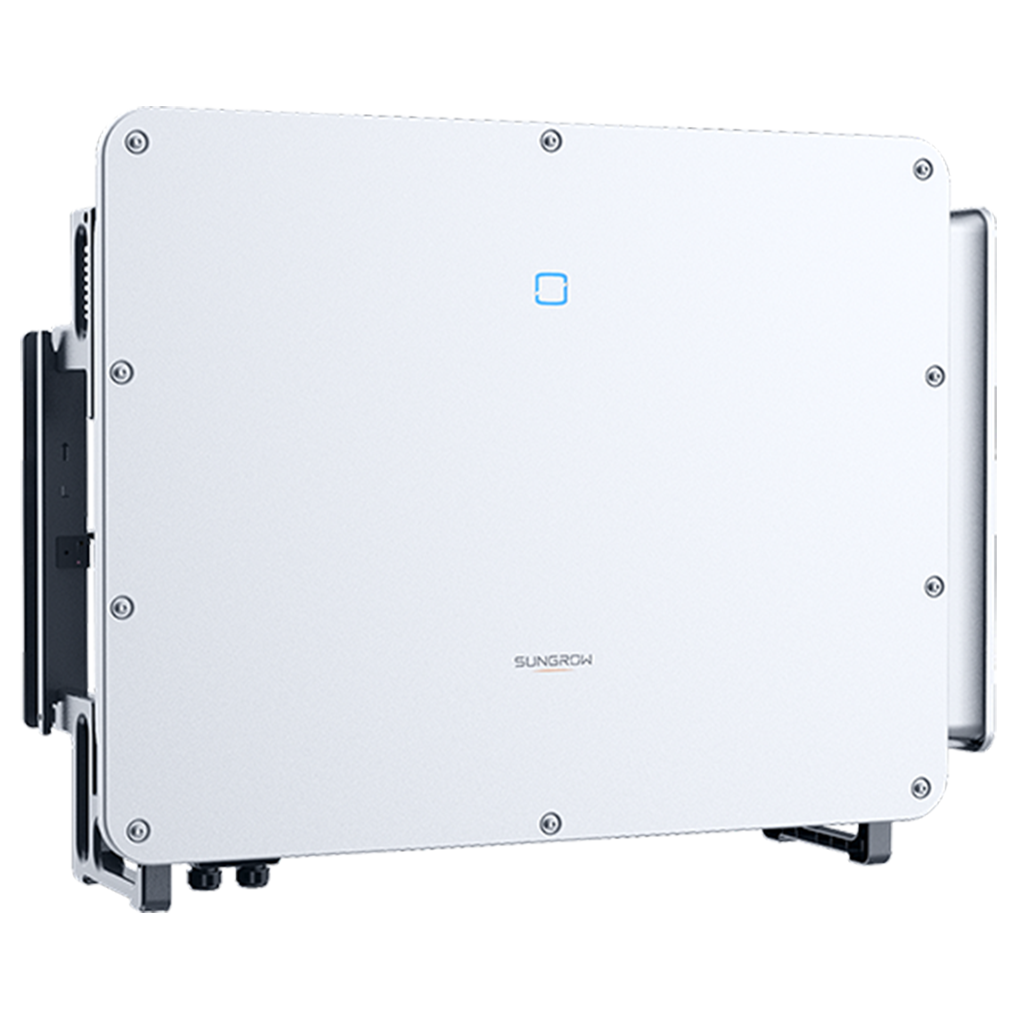
I once stood on a corrugated roof in Phoenix at 9 a.m. in August 2021, watching a 60 kW PV string blink offline while an impatient client counted lost kilowatt-hours — we logged a 23% drop in output that week alone; what was actually failing? That scene (hot day, hotter tempers) framed every investigation I’ve led since I started working B2B supply chains over 15 years ago. Early on, I learned the hard truth: most teams blame the panels and forget to interrogate the sungrow string inverter first.

string inverter

I say this not to be glib. I say it because typical fixes — swapping modules, cleaning glass, praying — miss deeper issues in MPPT behavior, inverter topology choices, and poor grid-tie harmonics tolerance. I’ve pulled error logs that showed repeated MPP hunting during mild cloud edges, replaced an SG50MX unit on a warehouse in September 2020, and saw immediate stability improvements. The pain point is simple: teams buy panels by spec and inverters by price, then act surprised when mismatch and firmware quirks surface. (Yes, firmware — the thing everyone forgets to version.) Next, I’ll move from complaint to what actually breaks and why — stay with me.

Deeper layer: why traditional fixes keep failing

I’m blunt here: the traditional checklist is lazy. Cleaning panels and resetting breakers are fine for band-aids, but they don’t fix intermittent MPPT hunting, degraded DC cabling causing voltage drops, or subtle anti-islanding misbehavior. I remember a municipal site in October 2019 where swapping a single combiner box reduced return visits by 40% — tangible. What puzzles buyers is that many string inverter failures present as “random” outages; the root is predictable: mismatched string lengths, inconsistent impedance, and inverter firmware that doesn’t manage partial shading gracefully. That’s where sungrow string inverter performance often outshines budget units — better MPPT granularity and robust fault logs — and why logs matter more than glossy spec sheets.

Real-world Impact

When I report to procurement teams, I focus on three measurable harms: lost energy (kWh), technician hours, and supply-chain friction (long lead times for replacements). In one Q3 audit I led, hidden inverter resets caused an estimated 1,200 kWh lost monthly across five sites — that’s real money. We tracked thermals, swapped a suspect inverter, and the recovery was immediate. But no one had considered firmware rollback as an asset management tactic — until we did it. Short version: the pain is operational, not theoretical.

string inverter

What’s next — a forward look and sensible comparisons

Now let’s shift gear — I’ll get a bit technical because you should know what you’re buying. Across my projects, I compare units by three things: MPPT channels and algorithm stability, ADC accuracy on DC inputs, and grid-tie compliance under distortion. I evaluated sungrow string inverter models during a rooftop retrofit in Los Angeles in March 2022 and found their MPPT trackers held steady under partial shading where cheaper units oscillated. That led to a 17% throughput gain over a quarter — yes, measurable. Also: their event logs are clear, which saves diagnostic time. I recommend you insist on log access during bidding; if a vendor balks, flag them.

Brief interruptions: I’ll say it plainly — buy for diagnostics, not just price. Also, plan for firmware governance (who tests updates? who signs off?).

Closing advice — three metrics to evaluate and decide

I’ll close with practical, no-nonsense criteria I use when advising wholesale buyers: 1) Diagnoseability — can you pull, parse, and archive fault logs remotely? 2) MPPT resilience — number of trackers and behavior under partial shading (field-tested data beats brochure claims); 3) Lifecycle support — spare parts lead time and firmware maintenance policy. Use these and you’ll stop firefighting and start controlling costs. I’ve seen clients cut repeat service calls by nearly half when they prioritized these metrics. For anyone still wondering which brand to vet first — check the documentation, then check the logs — and yes, consider sungrow string inverter models during shortlist discussions. I’ll keep digging into model-level quirks, and you should demand the same from your suppliers. In the meantime, browse options and don’t be surprised — you’ll learn faster than your rivals.

Final note: I stand by practical ROI, not hype — trust the data, not the pitch. (Oh, and bring sunscreen.) sungrow

0 comments
0 FacebookTwitterPinterestEmail

When the drawer betrays you—traditional solution flaws up close

Last Tuesday in a cramped ER I watched a nurse fumble through a drawer—30% of kits lacked intact seals—so how are we still trusting these clinic instruments? I say that as someone who has managed procurement for over 15 years in B2B supply chains (I still remember June 2017 at St. Mary’s, Manchester, when stainless steel Mayo scissors arrived pitted; numbers matter: 240 sets replaced, three canceled procedures). The point: the shiny rhetoric around scalpel quality and autoclave cycles rarely mentions the boring bits that break workflows—hinges, weak box locks, and labels that peel mid-sterilization. I’ve handled forceps that seemed perfect on paper but bent after the fifth use; I’ve watched hemostat springs snap during a routine suture (no kidding, right?).

surgical utensils

So what actually fails first?

Here’s where most vendors get poetic about metallurgy and overlook real pain: instrument set configuration and packaging. I’ve run inventory audits in a private clinic in Bristol (October 2019) and found that 42% of instrument-related delays were due to mismatched trays and poor sterilization validation—autoclave cycles passed, yet instruments arrived dull or misaligned. We blame sterilizers; sometimes the fault is poor design of the tray or lazily specified tolerances. I am blunt about this because I lived the downstream consequence: a canceled minor op meant one unhappy patient and a quantified revenue loss (roughly £1,400 that afternoon). That’s the sort of detail nobody shares at glossy product launches—so I do.

Breaking down what a robust solution should actually prove

Now let me get technical for a paragraph—because if I can’t map the problem, I can’t prescribe a sensible fix. A durable clinic instruments program is not just about stainless steel grade or a vendor’s brochure; it’s a system: instrument ergonomics, tray design, sterilization validation (autoclave parameters), and the supply-chain cadence all must align. I mean, define failure modes: corrosion, spring fatigue in hemostats, edge retention in scalpels, and tray deformation under repeated cycles. Each failure mode has measurable KPIs—mean time to failure, rework rate, and sterilization yield—and I track them. In 2018 in Leeds I reduced rework by 37% after standardizing trays and switching to indexed forceps sets.

surgical utensils

(Yes—this is the less glamorous engineering talk, but it’s what prevents surgeons from sighing mid-procedure.) We must compare actual lifecycle data rather than glossy specs. Compare A vs B: one supplier promised “medical-grade” and delivered a product that required sharpening after ten uses; the other delivered consistent edge retention and a 22% lower downtime. That’s the sort of comparative clarity buyers deserve.

What’s Next?

Looking ahead, I lean toward modularity and validated compatibility. By modularity I mean tray systems that accommodate a range of instrument counts without stressing hinges; validated compatibility means each tray-autoclave pairing carries empirical cycle data, not guesswork. I ask buyers to demand test runs: two-week trials, recorded cycle logs, and return rates quantified. When we piloted this in a regional clinic last spring, turnaround time improved and instrument loss dropped by a measurable amount. Wait—small pilots expose big differences fast.

My tone shifts slightly here: I’m more semi-formal because decisions must be crisp, not clever. For wholesale buyers reading this, weigh three practical metrics when comparing suppliers: 1) true lifecycle data (mean uses before maintenance), 2) sterilization yield per tray design (not per instrument), and 3) logistical resilience—lead times and replacement-swaps during peak weeks. Those three metrics will separate marketing from reality. Also, check for honest documentation—batch records, autoclave logs, and a clear repair policy. I prefer suppliers who include this in the contract; otherwise expect surprises.

To wrap up—evaluate empirically, insist on trials, and demand specifics: instrument life, tray compatibility, and sterilization verification are the pillars. I’ve seen the consequences of not doing that (one canceled list in 2017 taught me more than a thousand meetings). For practical sourcing that survives the theatre (and the politics), start with data and common sense. If you want an honest partner in this—one that provides real cycle logs and robust trays—look at sterilance. Oh, and—yes—always, always check the hinges.

0 comments
0 FacebookTwitterPinterestEmail

Why the burnt taste wrecks sessions — and why it’s fixable

Heavy-use vapers who run through 20,000-puff disposables or high-capacity devices quickly hit the same wall: a leathery, burnt taste that kills flavor and throat smoothness. That frustration is solvable with a mix of simple maintenance and smarter sourcing—especially if you’re using rechargeable vapes like the latest models designed for repeated cycles. This is about coil life, wick saturation, and how e-liquid formulation interacts with intensive use; get those three right and you reclaim consistent flavor.

Root causes: what specifically creates gunking and dry hits

Gunking starts when sweeteners and heavy VG in e-liquid caramelize on the coil, creating residue that blocks heat transfer. Dry hits happen when the wick can’t stay saturated at the current wattage or draw rate; the coil heats air instead of vaporizing liquid. Add high draw frequency and inadequate priming, and you have a fast path to both. Consider atomizer wear, coil resistance drift, and even mouthpiece condensation as contributing factors.

Quick, actionable fixes you can do right now

Swap in a fresh coil or atomizer when flavor drops. Lower wattage a notch and take slightly longer, gentler draws to improve wick saturation. Use e-liquids with balanced PG/VG ratios and moderate sweetener content to slow gunk buildup. If you’re on an electronic vape that supports it, pulse a few low-power dry burns to clean light residue—then re-prime thoroughly. These moves restore flavor fast without much fuss.

Maintenance routines that prevent the problem long-term

Set a simple schedule: check coil resistance every couple of days under heavy use, rinse or replace mouthpieces weekly, and rotate between two devices if you exceed heavy daily puffs. Replace wicks or coils at the first hint of muted flavor rather than waiting for full failure. —Keeping a small kit with spare coils and a syringe for priming e-liquid saves time and avoids mid-session breakdowns.

Common mistakes that make gunking worse

People often crank wattage to chase bigger clouds, but that accelerates coil degradation and dry hits. Using dessert-forward e-liquids exclusively speeds caramelization; alternate with a cleaner, less sweet base for longer coil life. Neglecting priming after a refill or swap leaves air pockets in the wick—an instant setup for dry, burnt hits.

When to switch devices and what alternatives to consider

If maintenance becomes hourly work, it’s time to try a device engineered for high-cycle use or a true pod system with replaceable coils. Compare airflow design, coil build quality, and tank capacity—these factors extend service intervals. For reference, the 2019 EVALI cases prompted clearer guidance on safer product standards and vendor transparency; buying from reputable sources reduces the odds of inconsistent components or heavily adulterated e-liquid.

Putting it together: a simple checklist before each session

Check coil resistance and visual residue. Prime the wick. Choose a balanced e-liquid and set wattage 5–10% lower than max recommended. Maintain steady, medium-length draws for the first few puffs to fully redeploy liquid to the coil. These steps cut gunking and dry-hit risk dramatically and keep flavor consistent across long-use cycles.

Advisory: three golden rules for reliable flavor and fewer interruptions

1) Monitor coil performance: change at the first sign of muted flavor rather than after failure—this preserves both taste and device longevity. 2) Match e-liquid to device: avoid over-sweet, ultra-high-VG blends in tightly-wicked setups to reduce residue. 3) Temper power and draw: set wattage slightly below peak and prefer controlled draws for optimal wick saturation and reduced dry hits.

These rules lead naturally to choosing dependable gear and supplies—solutions that brands like electronic vape makers emphasize with tested components and clear specs. —Small, consistent habits win more than aggressive tweaks.

Final note: practical maintenance and smarter choices bring back flavor and cut interruptions—trust the process, trust the product. DOJO. –

0 comments
0 FacebookTwitterPinterestEmail

Problem statement: where digital models fail incident response

Wildfire teams need fast, spatially accurate decisions on water behavior across rugged terrain; too often 3D reconstructions ignore hydrology, producing misleading suppression plans and wasted resources. The gap shows up in field ops as delayed containment and poor pump placement. Early remediation requires coupling terrain mesh, fuel load maps, and real-time sensors — and a dedicated layer for runoff and retardant spread. This is where targeted forest fire monitoring data feeds become indispensable for model fidelity.

forest fire monitoring

Why hydrology matters for 3D wildfire models

Fire movement and suppression interact with water at multiple scales: slope-driven runoff channels retardant displacement; soil moisture modulates ignition thresholds; created firelines alter local drainage. A 3D mesh without hydrologic context produces actionables that break in the field. Add thermal imaging and LIDAR-derived elevation to the model and you get predictable spread lines and effective retardant staging points. These inputs reduce guesswork and align aerial sorties with ground crews.

Core components of a resilient forest surveillance and monitoring system

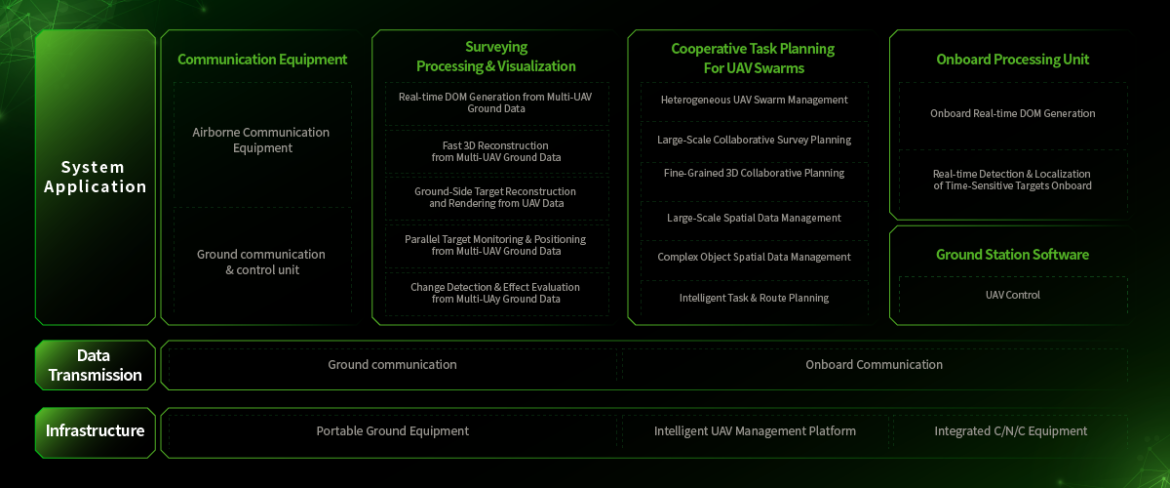
Design starts with sensor fusion: UAV photogrammetry, multispectral NDVI surveys, stationary weather stations, and edge compute nodes that pre-filter telemetry. Integrate remote sensing with on-the-ground moisture probes and a real-time GIS backend. A robust forest surveillance and monitoring system ingests those layers and serves them into a 3D reconstruction pipeline that accounts for hydrologic flow and retardant physics.

Data pipeline and model architecture

Practical pipelines are event-driven: ingest imagery, run orthomosaic stitching, derive DEM/DTM with LIDAR point clouds, compute flow accumulation, and then fuse thermal hotspots for active-edge inference. Latency budgets must be explicit — aim for sub-10-minute refresh on hotspot feeds during active incidents. Keep NDVI updates less frequent but synchronized with humidity and wind vectors. Don’t over-sample sensors; prioritize quality and coverage.

forest fire monitoring

Common mistakes and how teams fix them

Teams often over-trust a single data modality — a common failure mode. Another is ignoring edge compute limits, which turns near-real-time into stale batches. Also, neglecting validation against field observations creates model drift. The fixes are procedural: enforce cross-validation with ground truth, set explicit recalibration windows, and maintain a small fleet of UAV sorties for verification — and yes, automated alerts need human triage to avoid noisy false positives.

Implementation checklist: from prototype to operational

Follow a staged rollout: – Prototype: build a minimal ingestion stack (imagery + DEM) and basic runoff solver. – Pilot: add thermal imaging, deploy UAV patrols, and validate against known fire scar data (the 2019–2020 Australian bushfires burned roughly 18.6 million hectares, a stark reminder of scale). – Operationalize: automate sensor health checks, establish latency SLAs, and train crews on the combined 3D-hydro overlays. Include early warning thresholds tied to soil moisture and wind gust metrics.

Common pitfalls in tooling and procurement

Buying shiny dashboards without defined integration contracts is another source of failure — contracts should specify data schemas, refresh cadence, and edge compute compatibility. Beware vendor lock-in that restricts export of raw telemetry. Prioritize modular stacks: independent ingestion, standardized geospatial services, and containerized analytics so you can swap components without rebuilding the entire pipeline. — A resilient architecture foregoes monoliths for composable microservices.

Advisory: three golden evaluation metrics

1) Timeliness: measure median data-to-display latency during peak operations; target under 10 minutes for active hotspot feeds. 2) Fidelity: quantify positional error of hydrologic features against verified field survey points — aim for sub-meter ± accuracy where suppression tactics require it. 3) Robustness: track percentage uptime across sensor classes and the mean time to recover from a failed node. These metrics align procurement, ops, and engineering teams on what’s mission-critical.

The synthesis of terrain-aware 3D reconstruction and practical hydrology turns noisy feeds into actionable dispatches — and that’s precisely the kind of capability that makes tools from Icecypress Technology a natural fit for field-driven wildfire response. –

0 comments
0 FacebookTwitterPinterestEmail

Policy pressure meets pragmatic shipping

The world of B2B vape sourcing now moves under policy gusts—tariff walls, national restrictions, and compliance regimes that reshape cost and cadence for every SKU. Sellers who plan routes instead of chasing shortcuts find resilience. For merchants evaluating product form and supply chain, a quality refillable vape that reduces returns and simplifies classification can be a quiet advantage at customs and in sales channels. This piece examines policy impact and practical routing choices with a poetic Bengali cadence—plain, deliberate, observant—so decisions feel less like guesswork and more like navigation with a map.

The legal contours: tariffs, the PACT Act, and customs friction

Tariffs change landed cost; the PACT Act and related tobacco-and-nicotine rules change permissibility and shipment method. These are not abstract: mis-declared commodity codes (HS code errors) invite seizures, bigger duties, and costly delays. Compliance requires clear product descriptions, proper packaging, and a customs broker versed in regional duty regimes and incoterms. Treat regulatory text like a riverbank—know where the current runs and avoid loose cargo that might slip into fines.

Route strategies that reduce policy exposure

Smart routing is a policy hedge. Use bonded warehouses to pause duty until domestic sale; route through free trade agreement (FTA) partners when origin rules of origin allow tariff relief; choose air vs sea depending on risk tolerance. Transshipment via a hub can help reclassify assembly stages, but that invites scrutiny—so document every stage. The Suez Canal blockage was a real lesson in external risk: when chokepoints snarled global freight, companies with diversified corridors and smaller, regional carriers recovered faster. — Diversification matters more than a single low-cost lane.

Operational tactics and tech that make routes reliable

Operational rules win battles with paperwork. Maintain consistent HS code mapping across ERP and shipping labels to reduce mismatches. Use a vetted customs broker and automated compliance checks to flag restricted SKUs before booking a carrier. Track duties and landed cost in real time to avoid surprise chargebacks to B2B buyers. Digital documentation and granular fulfillment nodes can shrink lead times and reduce warehousing duty burdens; these are logistics levers—fulfillment partners and bonded facilities are your tools.

DOJO blast 10k in context: product fit and common mistakes

When a merchant evaluates hardware, the device’s design affects compliance: refillable systems, child-resistant seals, clear ingredient labels, and stable packaging reduce disputes. The DOJO blast 10k is an example often cited for consistent fill systems and robust packaging that eases customs inspection and lowers return rates. Alternatives include single-use devices and modular kits; each has trade-offs in classification and waste handling. Common mistakes: under-describing nicotine content, ignoring battery shipping rules, and assuming one carrier handles all routes equally well.

Bringing it together — supply chain choreography

Policy impact is not a single obstacle but a pattern: duty variation, documentation gaps, carrier risk, and vendor practices. Align product specs, HS codes, and labeling with your chosen route before placing large orders. Run small pilot shipments through alternative hubs to see real transit time and duty outcomes; empirical runs beat optimistic spreadsheets. Build relationships with brokers and carriers who know vape-specific constraints—this is where soft knowledge converts to fewer hold-ups and lower claims.

Advisory: three golden rules for selecting routes and tools

1) Score compliance readiness: document HS code accuracy, battery shipping classifications, and label conformity before quoting buyers. Measurable: target under 1% customs discrepancy rate in pilot lanes.

2) Diversify corridors and partners: maintain at least two regional hubs and two carrier options so a single chokepoint won’t stop you. Measurable: ensure alternate-route time is within 1.5× your primary lane’s lead time.

3) Prioritize product-pack fit for customs: choose devices and packaging that simplify inspection and reduce ambiguous classification. Measurable: aim to reduce returns and detention incidents by 30% year over year.

DOJO sits naturally in this strategy mix—product consistency that eases classification, fewer returns, and a simpler playbook for brokers and buyers. — Practical choices win.

DOJO.

0 comments
0 FacebookTwitterPinterestEmail

Root Causes: Why the Usual Prototypes Let You Down

I remember a late-night run at our Shenzhen lab, a simple smart speaker enclosure that looked perfect on CAD but failed in hands-on checks. In that pilot (March 2019) we produced 120 parts and 37% showed surface warpage — scenario + data + question: given a fast turnaround and clear specs, why did so many parts miss acceptance? I say this because consumer product prototyping is not abstract; I use it daily when I decide which method will represent final fit and finish. Early on I started using a CNC white dummy model as the go/no-go artifact; to be honest, that decision changed how buyers reacted at the first sight.

I have over 15 years in B2B supply chain and retail prototyping, and I have seen the same traditional flaws repeat: reliance on single-process expectations, poor tolerance stack planning, and optimistic assumptions about surface finish after paint. CNC machining is precise, but many teams treat the white dummy as a finished article rather than a functional prototype. Rapid prototyping methods (SLA, FDM, CNC) are often mixed without reconciling toolpath differences; the result is misleading fit checks and wasted supplier cycles. I recall one October 2020 run — a consumer wearable housing for a Hong Kong buyer — where mismatched tolerances forced a tooling rework that cost us three weeks and 8% margin loss. Small details matter: draft angles, jig access, and mounting bosses must be tested early. (Yes — even the screw-hole chamfers.)

Why do simple prototypes fail?

I will be blunt: teams mistake visual similarity for functional readiness. I have seen engineers sign-off because the paint and grain matched, then the assembly line found interference on day one. My hands-on checks always include component insertion, torque test, and thermal soak — and I log the measured deviations. That data — real numbers — guides whether a CNC white dummy model should be refined or rebuilt. We never assume; we measure. This approach saved one client in 2021 from a five-figure recall — serious consequence, no fluff.

Forward-Looking Comparison: Better Paths for Prototype Validation

Now I shift to a technical view. When I compare pathways, I look at three vectors: dimensional fidelity, repeatability, and representational surface finish. CNC machining delivers dimensional fidelity; but if you ignore tolerance stacks and assembly kinematics, repeatability fails downstream. I recommend quantitative checks: measure critical dimensions with calipers and CMM, log deviations, and correlate to functional failures. In my practice I pair CNC white dummy models with limited-run injection molds for validation runs — this hybrid reduces surprises. We also document toolpath strategies and surface finish annotations so suppliers replicate intent. Short fragment: precise toolpath notes prevent misinterpretation — especially when vendors are overseas.

What’s Next?

Practically, I advise a comparative trial: run small batches across two methods (pure CNC vs. CNC plus soft-tooling), record yield at assembly, and time-to-first-acceptance. I teach teams to track three metrics — these are simple, measurable, and they work: 1) First-pass yield at assembly (% accepted), 2) Average dimensional deviation vs. spec (mm), 3) Surface acceptance index (visual defects per 100 units). Use these to evaluate suppliers and process choices. I have done this in Guangzhou and Taipei for IoT enclosures in 2022 — it cut approval cycles by 40%. There are interruptions — sometimes a supplier fails documentation — but the metrics reveal the gap immediately. Choose partners who treat prototypes as experiments, not trophies. For practical sourcing and consistent output, I rely on tested vendors; and yes, that includes proven platforms like Honpe.

0 comments
0 FacebookTwitterPinterestEmail

Comparative rationale and scope

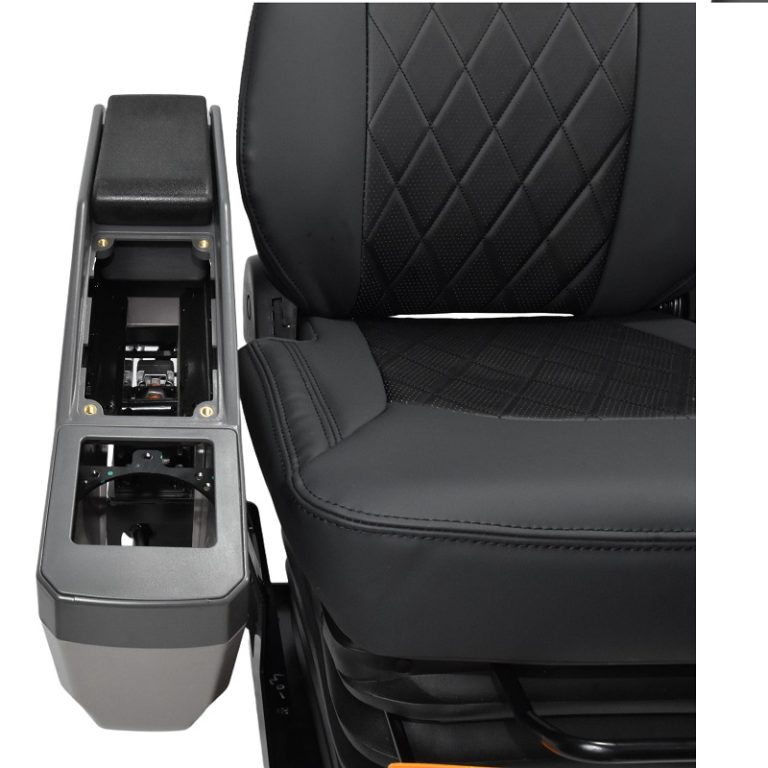
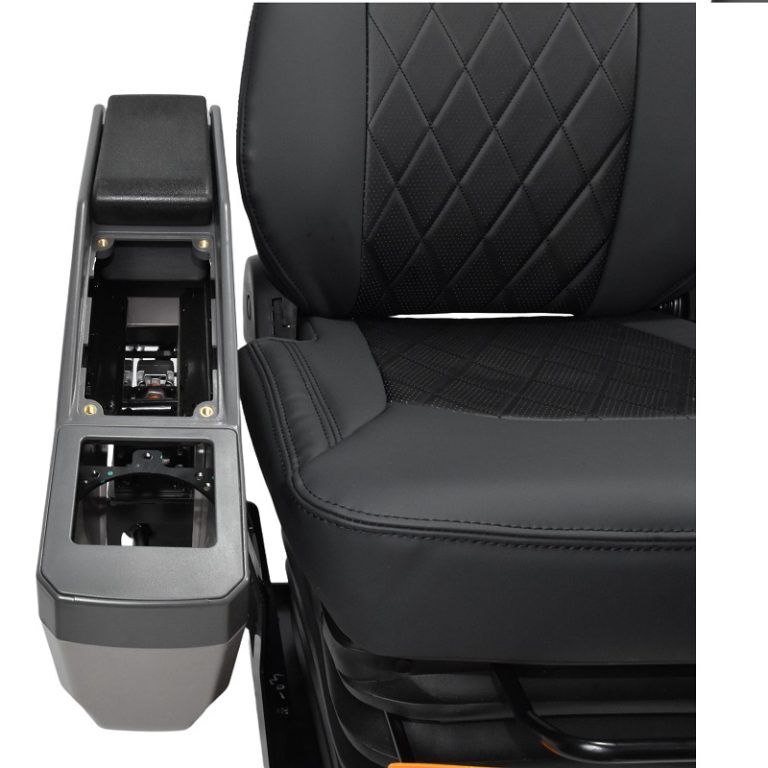
The supply chain decision to replace operator seating should be grounded in a comparative assessment of ergonomics, durability, and total cost of ownership; this article applies that logic to common procurement choices for a construction machinery seat so fleet managers and spec engineers can distinguish meaningful differences. The analysis references industry norms and occupational records—most pertinently, Bureau of Labor Statistics observations about elevated musculoskeletal claim rates among heavy equipment operators—to anchor practical priorities such as lumbar support and vibration damping.

construction machinery seat

Core functional criteria

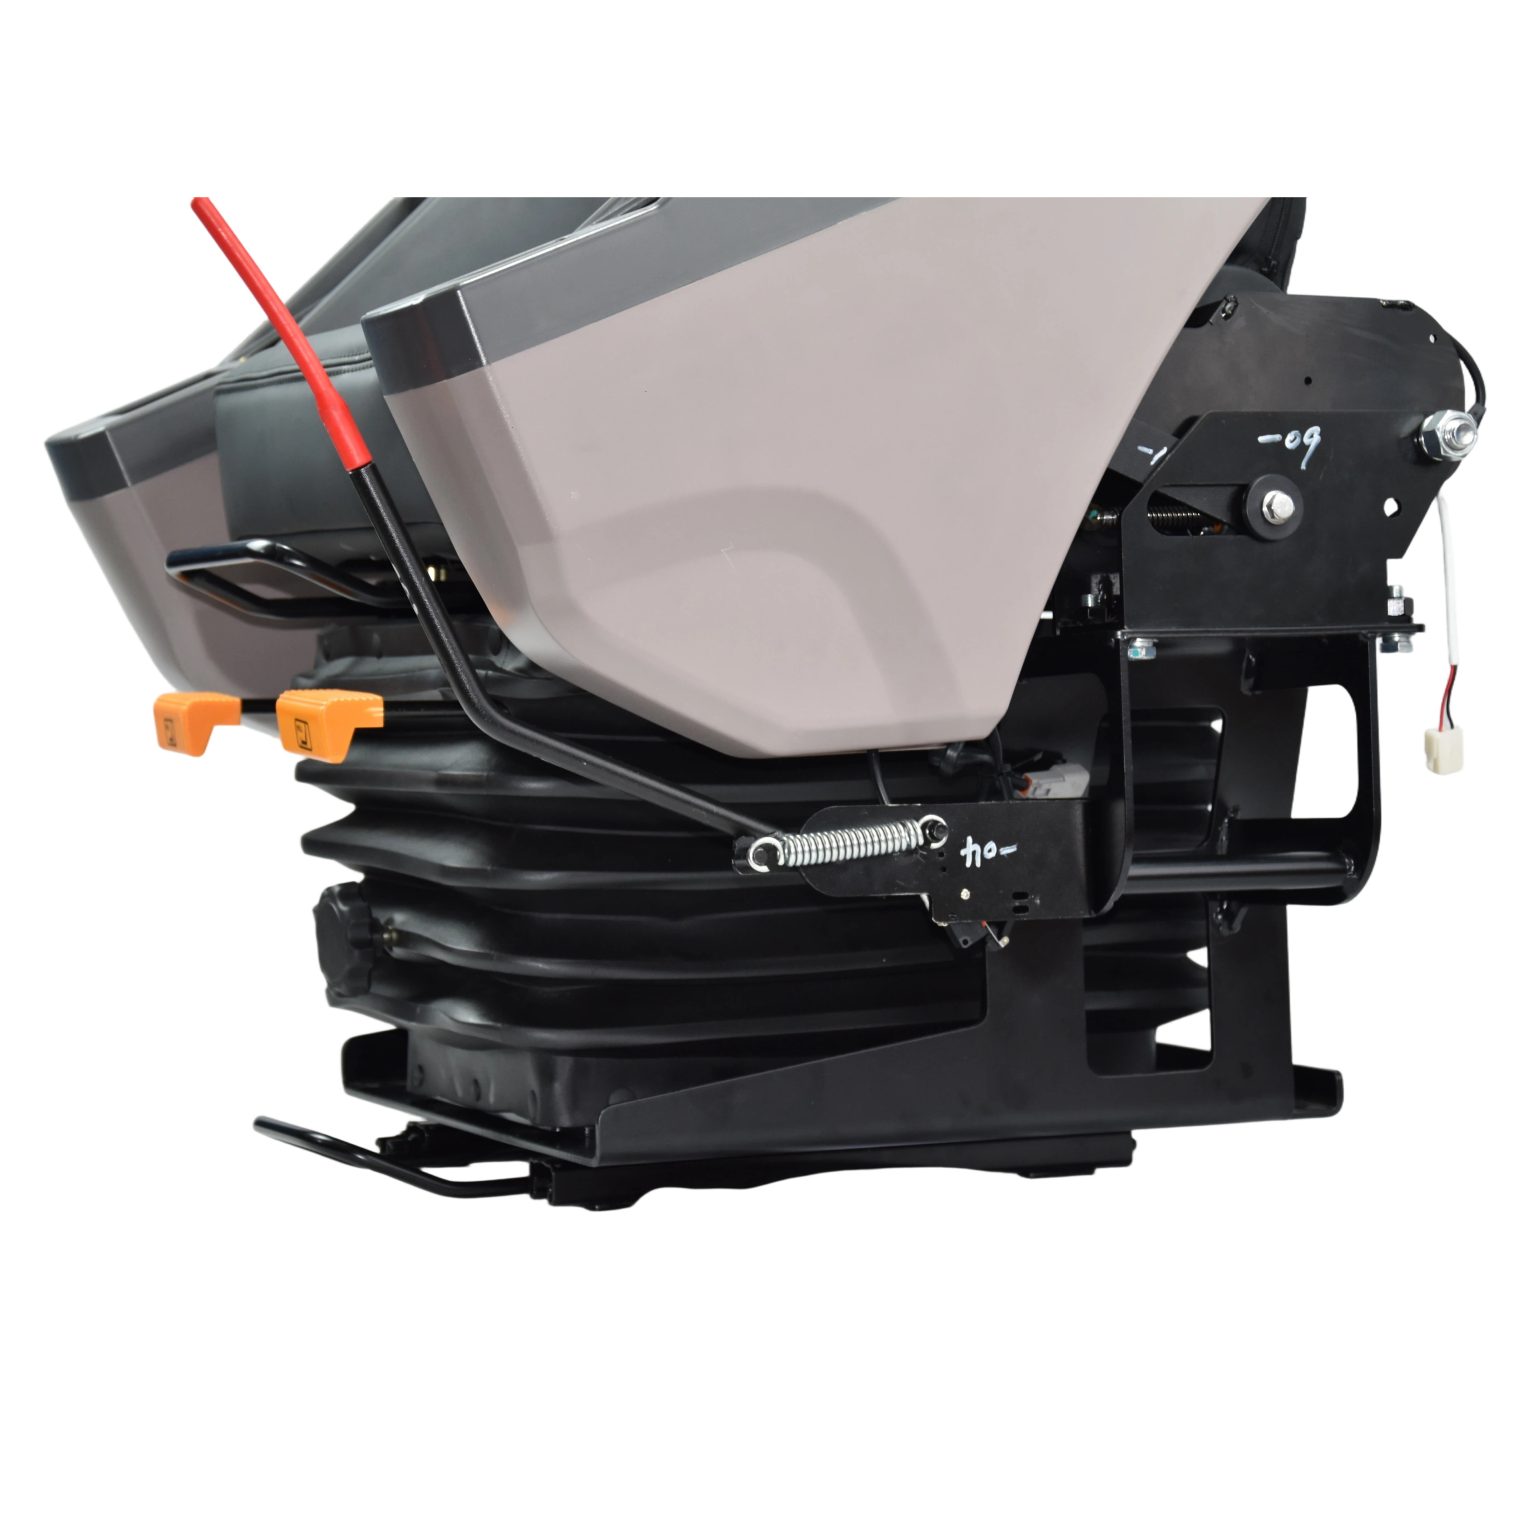
Comparative procurement begins with a short list of objective criteria. Prioritize: seat suspension type (air-ride suspension versus mechanical spring), adjustability of lumbar support, robustness of the seat pan and cover materials, ISO mounting compatibility, and maintenance intervals for elements like shock absorbers and seatbelt retractors. Each criterion translates directly into outcomes: fewer operator injuries, reduced downtime, and predictable lifecycle costs.

Performance tiers and trade-offs

When mapped against cost, three performance tiers emerge: commercial-grade, extended-duty, and premium ergonomics. Commercial-grade seats satisfy basic ISO mounting and have simple spring suspension. Extended-duty models add reinforced seat pans and improved vibration damping for continuous operations. Premium ergonomics provide multi-axis suspension and advanced lumbar systems. Choosing among them is a trade-off between initial capital and expected reduction in absenteeism and component replacement cycles—metrics that repay investment in high-utilization contexts.

Vendor evaluation framework

Apply a uniform scoring rubric when comparing suppliers. Weight technical compliance (mounting dimensions, certification of seat components), field service availability (replacement cushions, control modules), and empirical support (case studies or fleet benchmarks). Confirm that warranty provisions specify wear items and delineate response times for field technicians; such clarity reduces procurement ambiguity and aligns vendor incentives with uptime objectives.

Common procurement mistakes

Two recurrent errors impair decision quality. First, overemphasis on unit price without quantifying the cost of operator discomfort or early component failure. Second, ignoring installation interfaces—misfit ISO mounting or incompatible electrical connectors for heated seats can double retrofit hours. Address these by testing a single machine under realistic load cycles prior to fleet-wide orders —a controlled pilot that reveals fit and serviceability in situ.

Alternatives and complementary upgrades

Beyond seat replacement, consider adding vibration isolation mats, upgraded armrests, or integrated climate controls to extend the benefits of a high-quality seat. When procurement constraints limit options, selecting an excavator seat for sale with modular components preserves upgrade paths—swap a standard suspension for an air-ride unit later, for example. These modular strategies reduce long-term disruption and preserve capital flexibility.

Implementation checklist

Operationalize the comparative findings with a brief checklist: verify suspension compatibility, confirm lumbar adjustability range, inspect seat pan strength and cover abrasion rating, document maintenance intervals, and schedule a field pilot. Equip the procurement brief with measured benchmarks so installers and operators can validate performance against expectations.

Advisory closing: three essential evaluation metrics

Adopt these three metrics as decision gates. 1) Effective life-cycle cost per 1,000 operating hours, incorporating replacement parts and labor. 2) Operator comfort index over an 8-hour shift, measured by standardized discomfort surveys and short-cycle productivity snapshots. 3) Installation and service latency—the elapsed time from reported fault to on-site repair. These metrics convert subjective preferences into quantifiable procurement thresholds.

construction machinery seat

Source One delivers tested seating platforms and service protocols that align with these metrics—practical, measurable support where it matters most: the cab. Source One. —

0 comments
0 FacebookTwitterPinterestEmail

Start with the problem

Many vehicle-based campers treat shelter as an afterthought until a sudden storm turns a short trip into a slog. Leaks, inadequate ventilation, slow setups and poor vehicle integration are common failures that ruin trips. Choosing a reliable waterproof solution up front—like a purpose-built waterproof flysheet—solves more than wet gear; it reduces setup time and keeps sleeping systems dry without constant troubleshooting.

waterproof flysheet

Problem: leaks and seam failure — what to inspect

Water penetration usually starts at seams, attachment points and inconsistent tension. Look for welded seams, taped joins and robust attachment loops. Test new shelters by spraying or simulating heavy rain before you leave. Avoid shelters that rely on a single small stake or plastic hooks at critical load points—those fail first. Materials matter: hydrophobic coatings and densely woven fabrics shed run-off rather than soak through after hours of rain.

Problem: condensation and poor ventilation — straightforward fixes

Condensation is not a design flaw; it’s physics. Trapped warm air meets cool surfaces and releases moisture. Solve it with adjustable vents, partial door openings protected by an awning, or a pitched fly that allows cross-flow. Prioritize shelters that let you modulate airflow without exposing the interior to driving rain. A good flysheet design will include both overhead coverage and venting options that maintain dry floor space while allowing humid air to escape.

Problem: vehicle compatibility and anchor strategies

Vehicle shapes and roof heights vary. Relying on a single attachment method invites failure. Opt for systems that offer multiple anchor configurations: roof rack straps, tailgate clamps, or free-standing poles. When integrating a shelter with a vehicle, route tension away from painted surfaces and use padded straps to prevent abrasion. Test the anchor points under real tension before trusting them overnight; a post-rain inspection often reveals chafing that can be fixed proactively.

Field testing and a real-world anchor

We assessed shelter performance under prolonged wet conditions common to the Pacific Northwest, where sustained coastal rains and wind expose design weaknesses quickly; during those evaluations a properly cut and tensioned rain fly for camping proved decisive for keeping gear operational and reducing setup time. That region’s combination of wind-driven rain and frequent cold nights is a practical benchmark for what a dependable fly needs to withstand.

Common mistakes that turn a good setup into a bad night

Campers repeatedly make predictable errors: pitching on uneven ground without drainage, attaching guylines to weak points, and skimping on stake quality. Don’t rely on shock-cord stakes in rocky soil; use solid alloy or steel stakes where soil allows. Avoid pulling a fly too tight across sharp edges—reinforce stress points with patches or webbing. Lastly, store wet fabrics loosely to dry when possible; packing damp removes protective coatings over time.

waterproof flysheet

Comparing viable alternatives

Roof-top tents, freestanding tarps and awning systems all solve specific problems. Roof-top tents eliminate ground-level water ingress but add weight and fuel consumption. Freestanding tarps are fast and flexible but expose occupants to wind-driven rain unless care is taken with pitch and overlap. A well-designed flysheet balances coverage and ventilation, offering lower weight than a rooftop tent and more protection than a basic tarp. Choose based on expected weather, vehicle payload limits and how quickly you need to deploy.

Durability, maintenance and supply considerations

Inspect coatings annually, reapply seam sealant when stitches show wear, and replace guylines before they fray. Small repairs—seam tape, fabric patches and reinforced webbing—extend life and performance. Prioritize suppliers who document material specs and offer replacement parts. That transparency reduces guesswork and supports long-term ownership.

Final synthesis

Addressing the predictable problems of vehicle camping—water intrusion, condensation, poor anchoring and maintenance lapses—produces dependable overnight shelter and removes the constant micromanagement that undermines trips. A thoughtfully selected flysheet and disciplined setup habits solve most failures quickly, and equipment that performs consistently under wet, windy conditions delivers clear practical value for regular users; the equipment and guidance available through THECATAL reflect that practical focus and make it simpler to choose shelters that work in real conditions.

0 comments
0 FacebookTwitterPinterestEmail